 English
  中文 (中国)
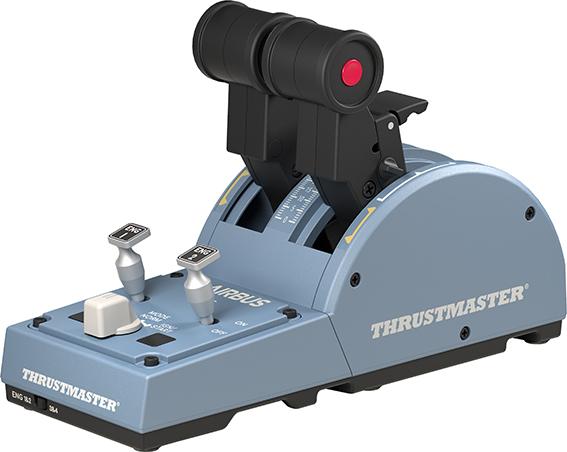
Game consoles: Xbox Series S™; Xbox Series X™
This article is a full step-by-step guide to assign a second TCA Quadrant Airbus and its TCA Quadrant Add-On Airbus in Microsoft Flight Simulator 2020 on Xbox Series S™ or Xbox Series X™ console.
Important: The default mapping of the TCA Quadrant Airbus in Microsoft Flight Simulator 2020 provides settings for the Airbus A320neo, which is a twin-engine aircraft. Using a second quadrant will control the power of a four-engine aircraft (e.g. Airbus A380) and requires custom settings.
I- Check the connections and position of your TCA Quadrant Airbus
Assignment to the appropriate engines is essential to the operation of each quadrant.
- The first quadrant should be in position 1&2 (default position)
- The second quadrant should be in position 3&4
Our article will help you to ensure the connections and the position of your quadrants:
- How to connect and use the TCA Quadrant Airbus Edition to play on Xbox console
II- Assign your second quadrant in Microsoft Flight Simulator 2020
Microsoft Flight Simulator 2020 on Xbox Series consoles includes a default mapping that supports your TCA Sidestick X Airbus, one TCA Quadrant Airbus, and the two TCA Quadrant Add-On Airbus. A second TCA Quadrant Airbus will be recognized by the game but will need to be manually assigned in a custom profile.
Here are the steps to follow in Microsoft Flight Simulator 2020 on an Xbox Series console.
1- Go to Options then to Controls options
Select TCA Sidestick X Copilot Default
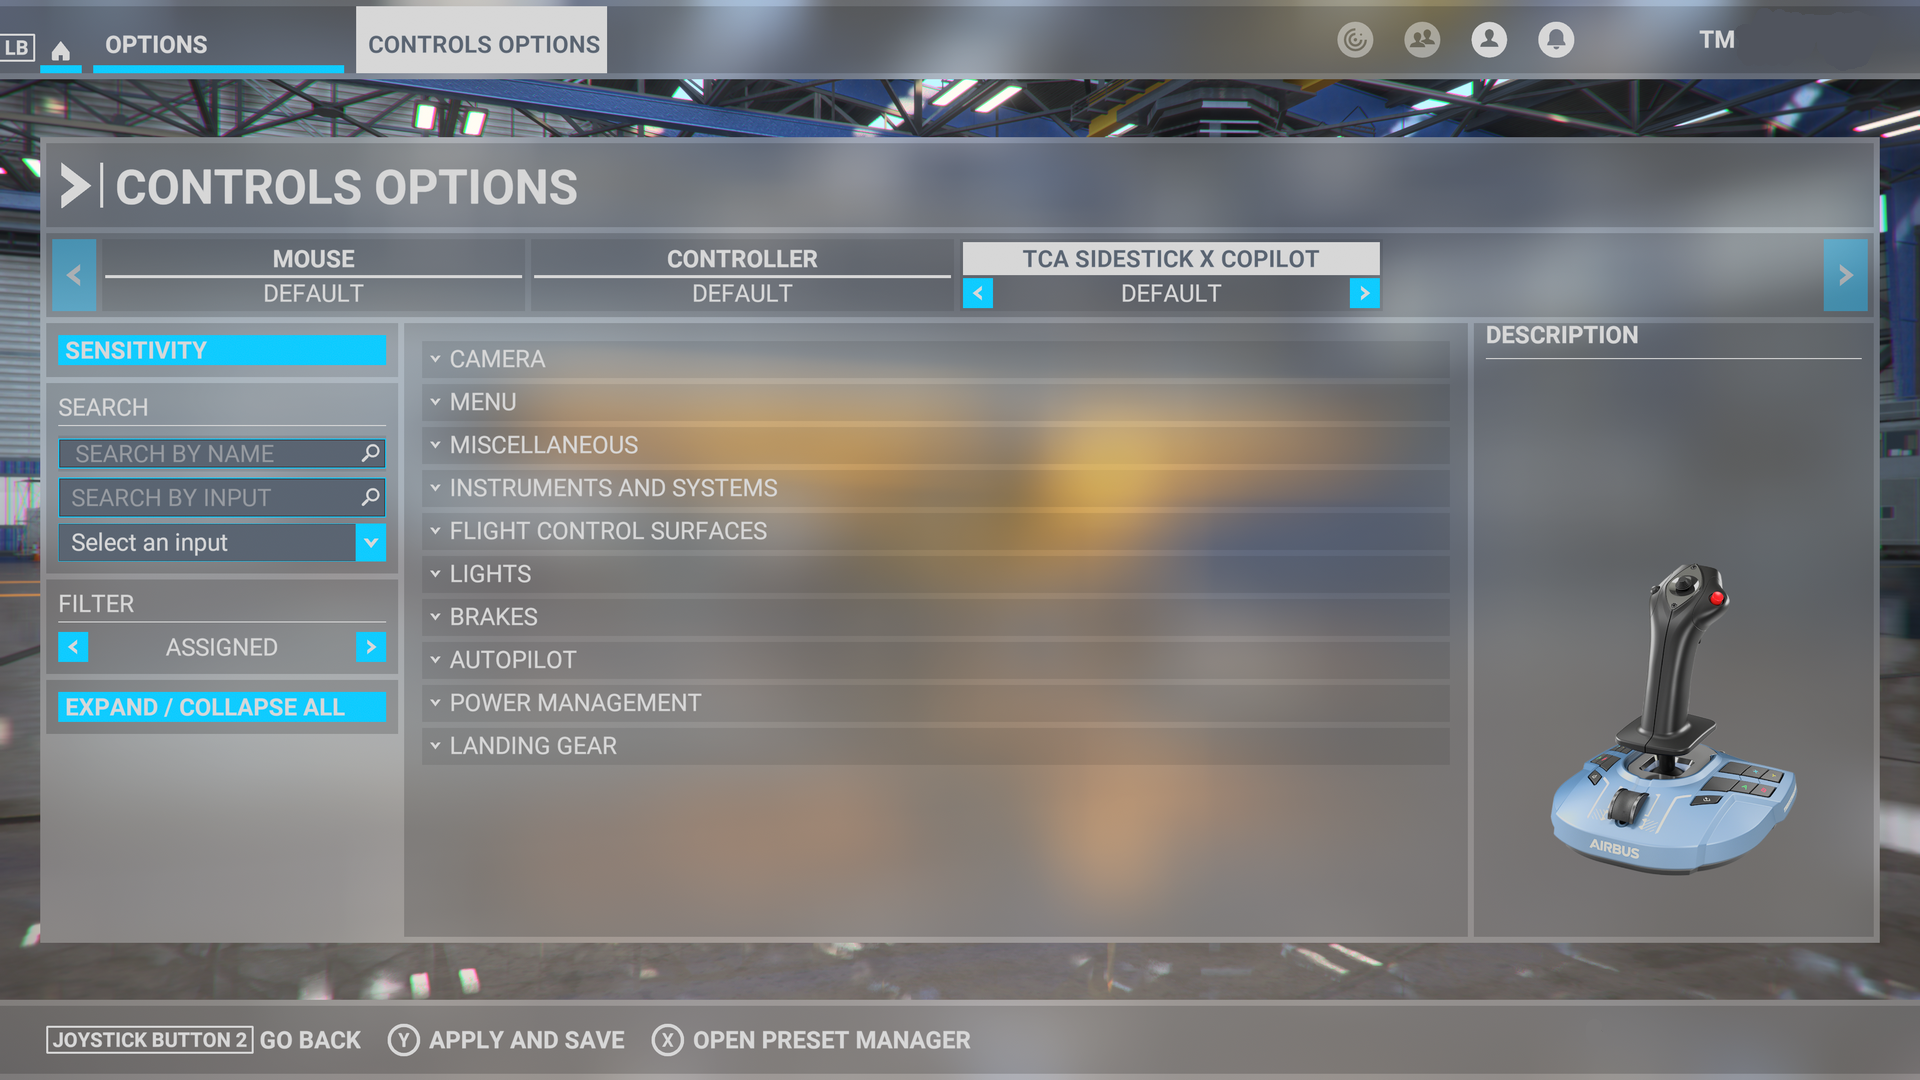
Your TCA Quadrant Airbus appears as axes of the TCA Sidestick X Copilot.
The Expand / Collapse all button opens or closes the collapse lists in the center of the screen.
Open the list Power Management, then open Throttle. You can see the two axes of your first Quadrant (in physical position 1&2).
- Throttle 2 Axis (0 to 100%) / Joystick L Axis 8
- Throttle 1 Axis (0 to 100%) / Joystick L Axis 5
The Reverse axis box is checked for each axis.
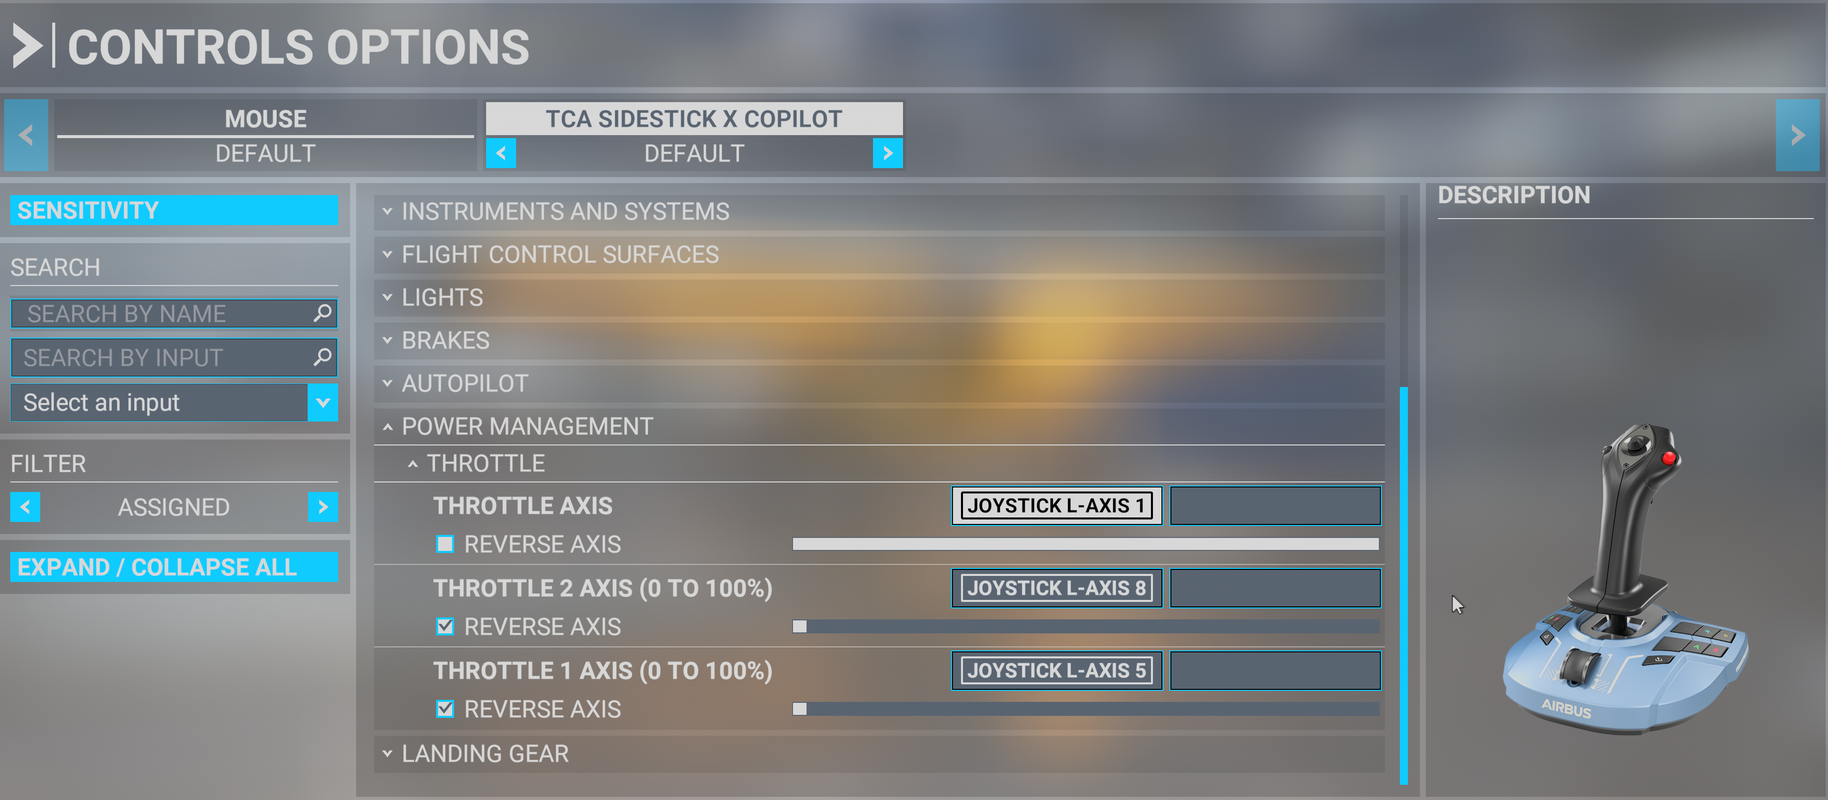
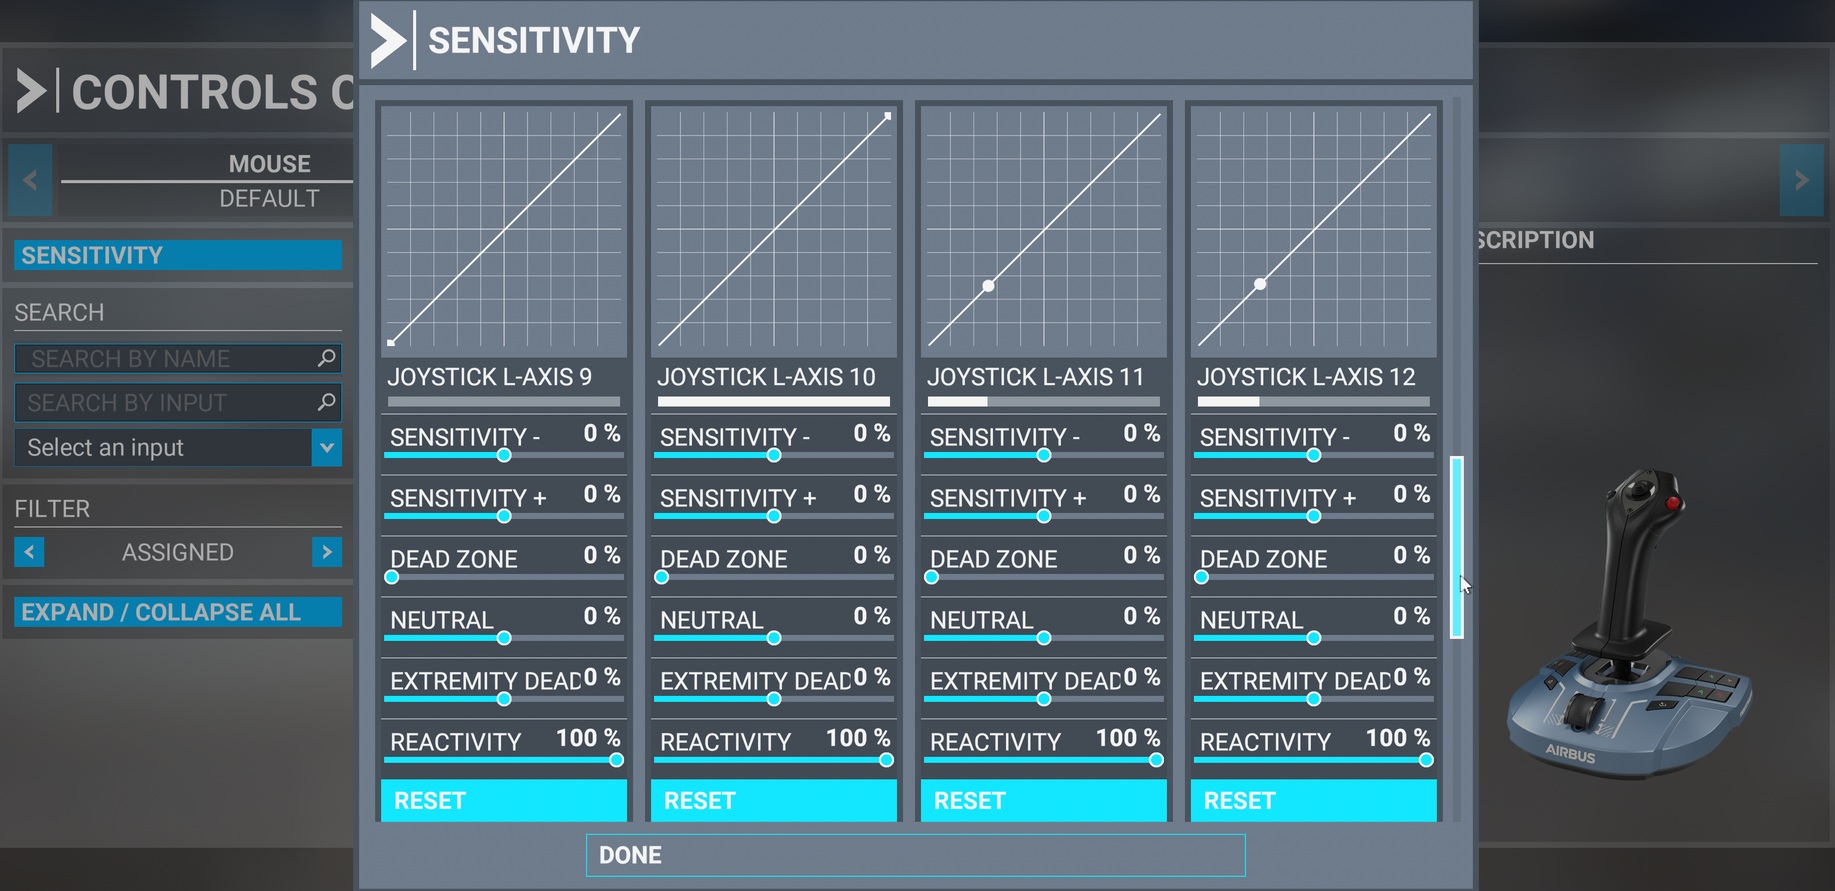
2- To identify the axes of your second Quadrant (in position 3&4), click on Sensitivity
The Sensitivity files represent all available axes. Push and pull the throttle controls of your quadrants to move the test bars in the files.
- Your Quadrant in position 1&2 is represented by the Joystick L Axis 5 and Joystick L Axis 8 axes.
- Your Quadrant in position 3&4 is represented by the Joystick L Axis 11 and Joystick L Axis 12 axes.
If a Quadrant does not respond to this test, exit the Options menu, unplug your TCA Sidestick X, check the connections and positions of your Quadrants (see Part I), reconnect your TCA Sidestick X, wait for the white light to come on, and return to this step.
Note about Sensitivity
In Sensitivity:
- The axes of your Quadrant 1&2, Joystick L Axis 5 and Joystick L Axis 8, are set by default for the Airbus A320neo, which is a twin-engine aircraft.
- The axes of your Quadrant 3&4, Joystick L Axis 11 and Joystick L Axis 12, have a default setting that works but will require adjustment.
We advise you to adjust the sensitivity of your axes so that they correspond to the four-engine aircraft you wish to fly.
In this regard, you can seek advice from the developer of Microsoft Flight Simulator 2020 and their community.
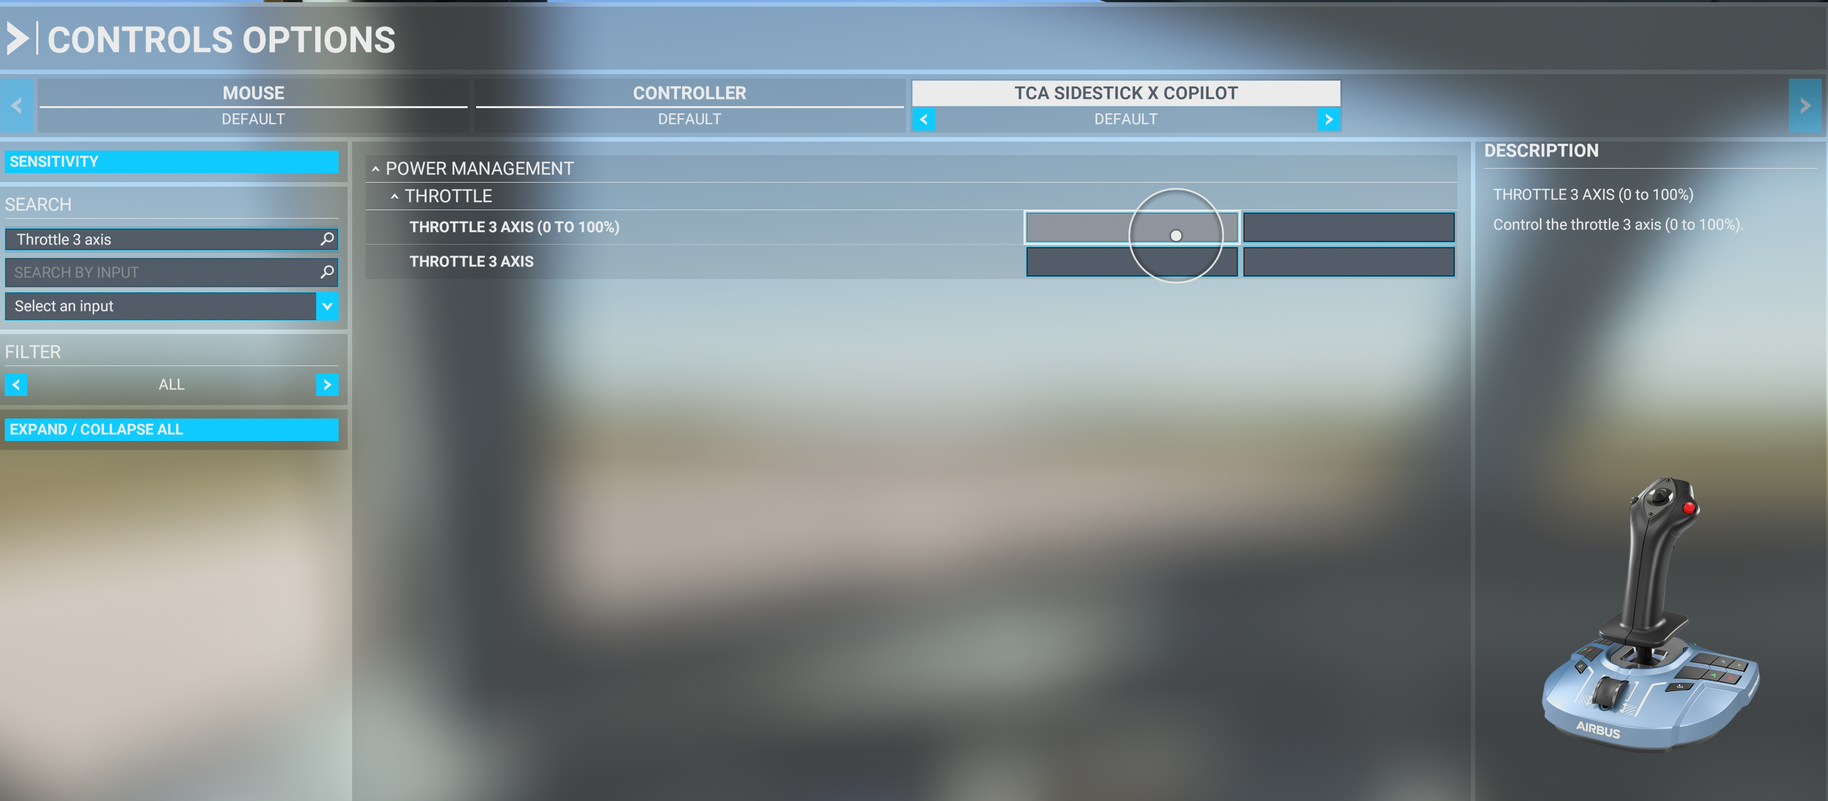
3- To assign the axes of the second Quadrant, under the Filter menu select All
In the central column open Power Management then open Throttle.
Find Throttle 3 axis (0 to 100%) and, on its line, click on the left empty rectangle.
- In the search window open the list Select an input
- Find and select Joystick L Axis 11
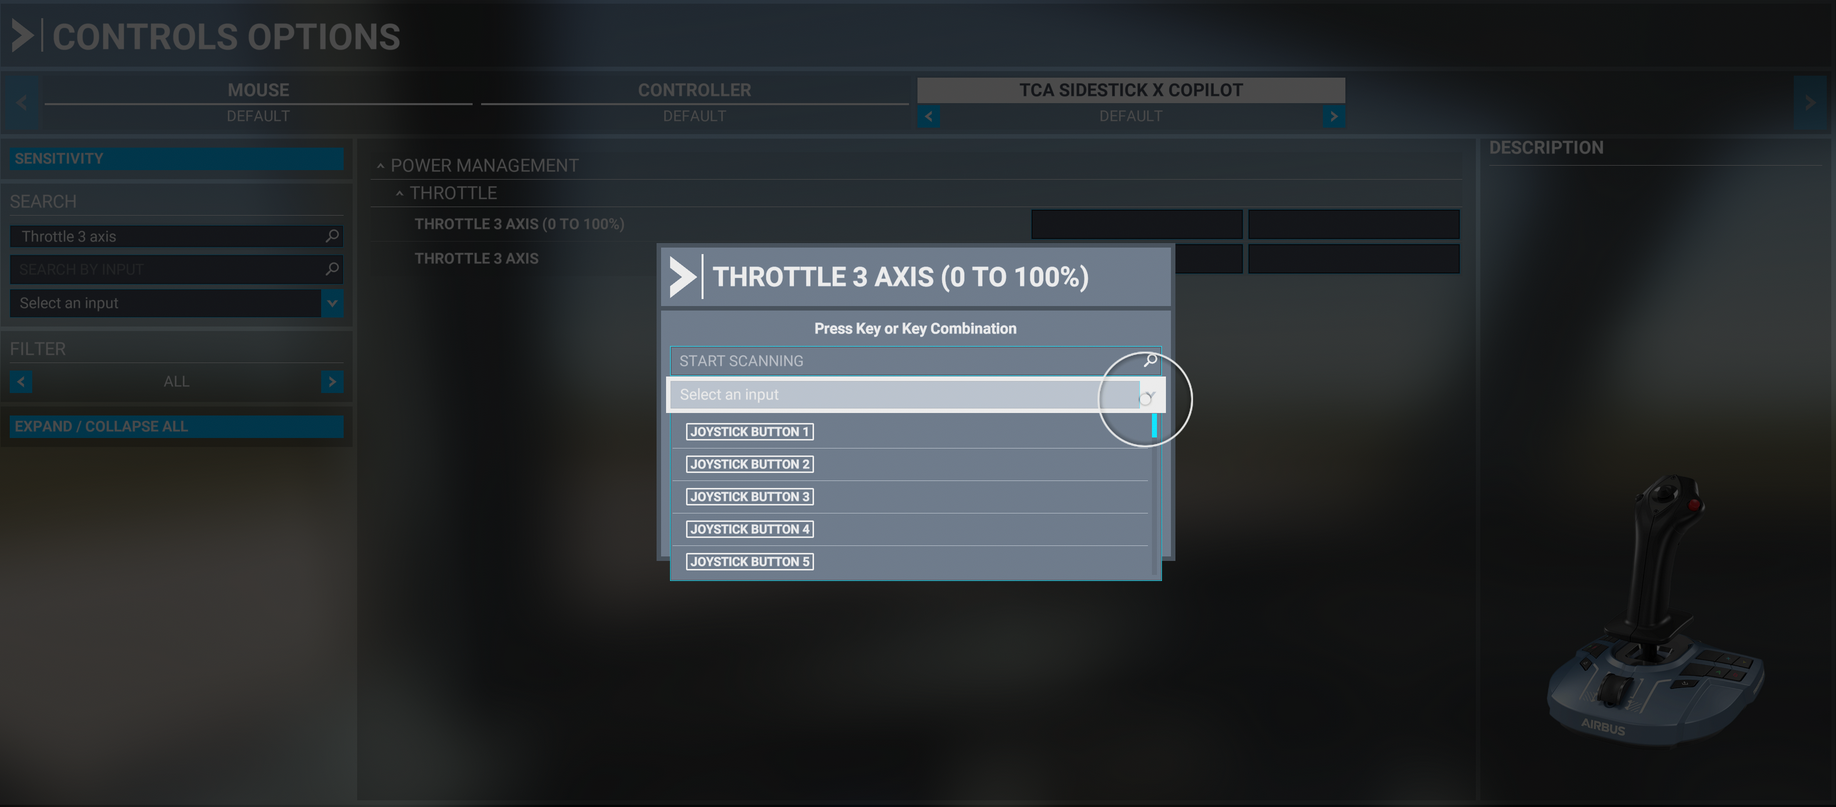
- Click Validate and save your profile
Repeat the operation and find Throttle 4 Axis (0 to 100%) and, on its line, click on the left empty rectangle.
- In the search window open the list Select an input
- Find and select Joystick L Axis 12
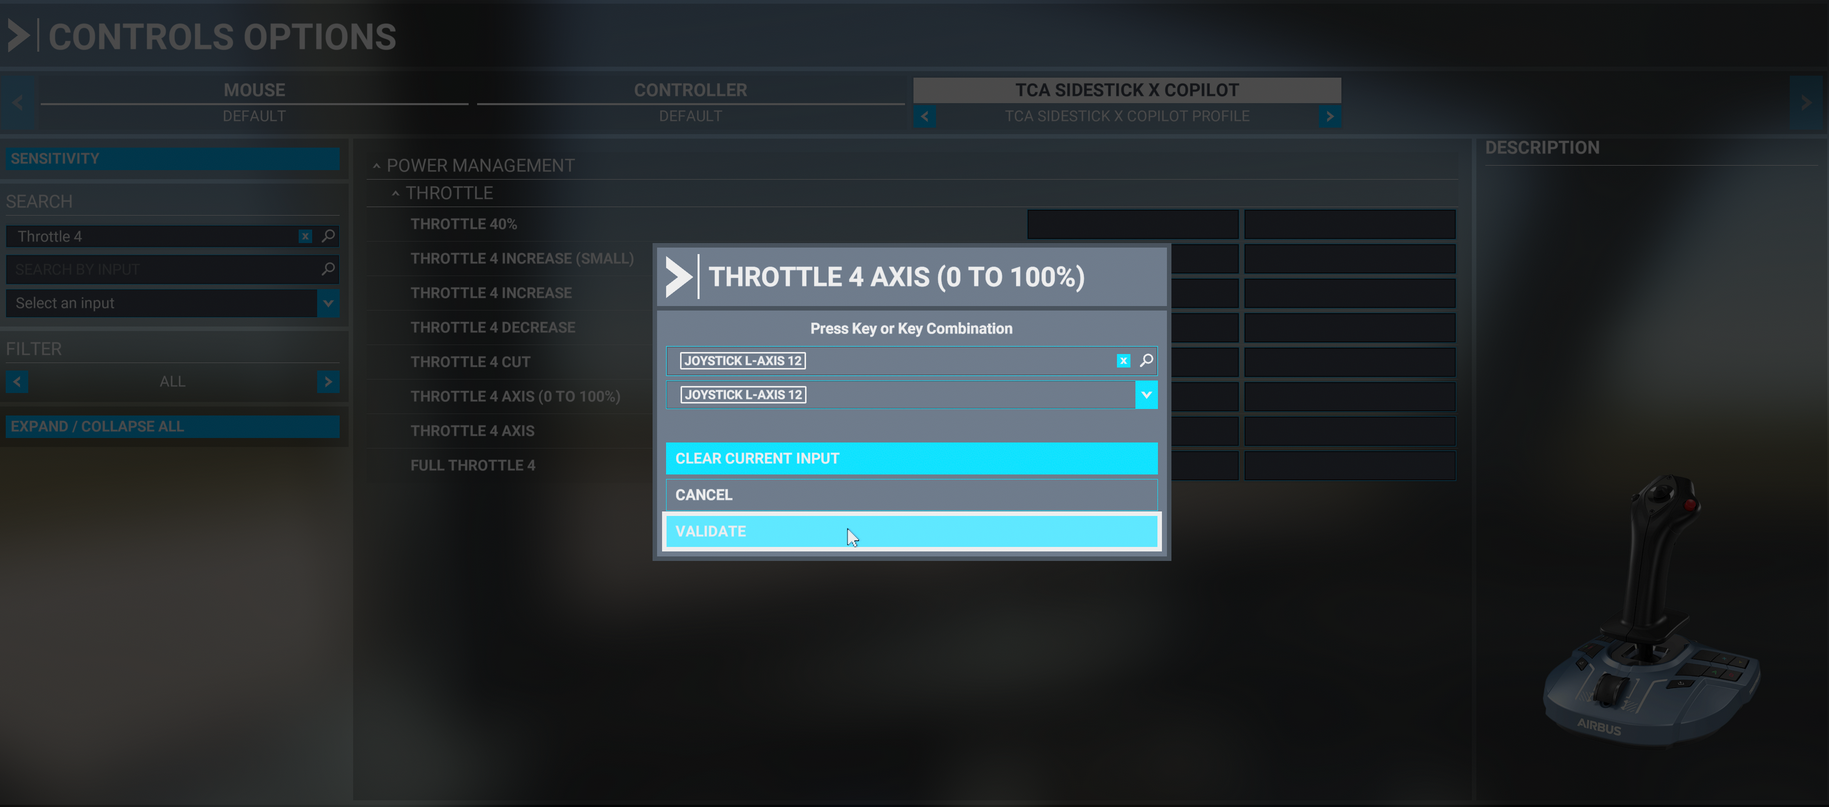
- Click Validate and save your profile
4- Assign the buttons of the Second Quadrant
Follow the same process as previously.
On the Quadrant in position 3&4, only the ENG 3 and ENG 4 buttons need to be assigned. The Autothrottle disconnect buttons need to be modified.
Important:
The other buttons are already assigned to the Quadrant in position 1&2 (CRANK, IGN/START, Autopilot ON and Autopilot OFF). They do not need to be assigned twice.
4.1 ENG 3 and ENG 4 buttons: under the Filter menu select All
Each engine button file must be assigned 3 times.
ENG 3
In the central column open Instruments and systems then open Fuel.
Find Set engine 3 fuel valve and, on its line, click on the left empty rectangle.
- In the search window open the list Select an input
- Find and select Joystick Button 39
- Click Validate and save your profile
In the central column open Instruments and systems then open Engine instruments.
Find Set starter 3 and, on its line, click on the left empty rectangle.
- In the search window open the list Select an input
- Find and select Joystick Button 39
- Click Validate and save your profile
Repeat the operation and find Set engine master 3 and, on its line, click on the left empty rectangle.
- In the search window open the list Select an input
- Find and select Joystick Button 39
- Click Validate and save your profile
Note: The same axis must be assigned three times, however the game may display a warning message because the axe is already assigned. If so, ignore the warning and validate.
ENG 4
In the central column open Instruments and systems then open Fuel.
Find Set engine 4 fuel valve and, on its line, click on the left empty rectangle.
- In the search window open the list Select an input
- Find and select Joystick Button 40
- Click Validate and save your profile
In the central column open Instruments and systems then open Engine instruments.
Find Set starter 4 and, on its line, click on the left empty rectangle.
- In the search window open the list Select an input
- Find and select Joystick Button 40
- Click Validate and save your profile
Repeat the operation and find Set engine master 4 and, on its line, click on the left empty rectangle.
- In the search window open the list Select an input
- Find and select Joystick Button 40
- Click Validate and save your profile
Note: The same axis must be assigned three times, however the game may display a warning message because the axe is already assigned. If so, ignore the warning and validate.
4.2 Modify Autothrottle disconnect button
The Autothrottle disconnect buttons (red buttons on the throttle sticks) need an adjustment.
In the default mapping this function is assigned to have the buttons available on the left and the right when your hand is on the throttle sticks. If your Quadrant 1&2 and Quadrant 3&4 are mounted together, you will have to assign the second Autothrottle disconnect button to the throttle stick at the right of your Quadrant 3&4.
In the central column open Autopilot then open Arm auto throttle.
The two buttons are already assigned:
Joystick Button 19 / Joystick Button 20
Click on the right rectangle (Joystick Button 20)
- In the search window open the list Select an input
- Find and select Joystick Button 38
- Click Validate and save your profile
5- Assign the second Quadrant add-on
If you use a TCA Quadrant add-on connected on your second Quadrant (in position 3&4), you need to assign its axes and buttons.
Follow the same process as previously.
5.1 Flaps: under the Filter menu select All
In the central column open Flight control surfaces then open Secondary control Surface.
Find Flaps Axes and, on its line, click on the left empty rectangle (you should see Joystick L Axis 9, click to replace this axis).
- In the search window, open the list Select an input.
- Find and select Joystick L Axis 13
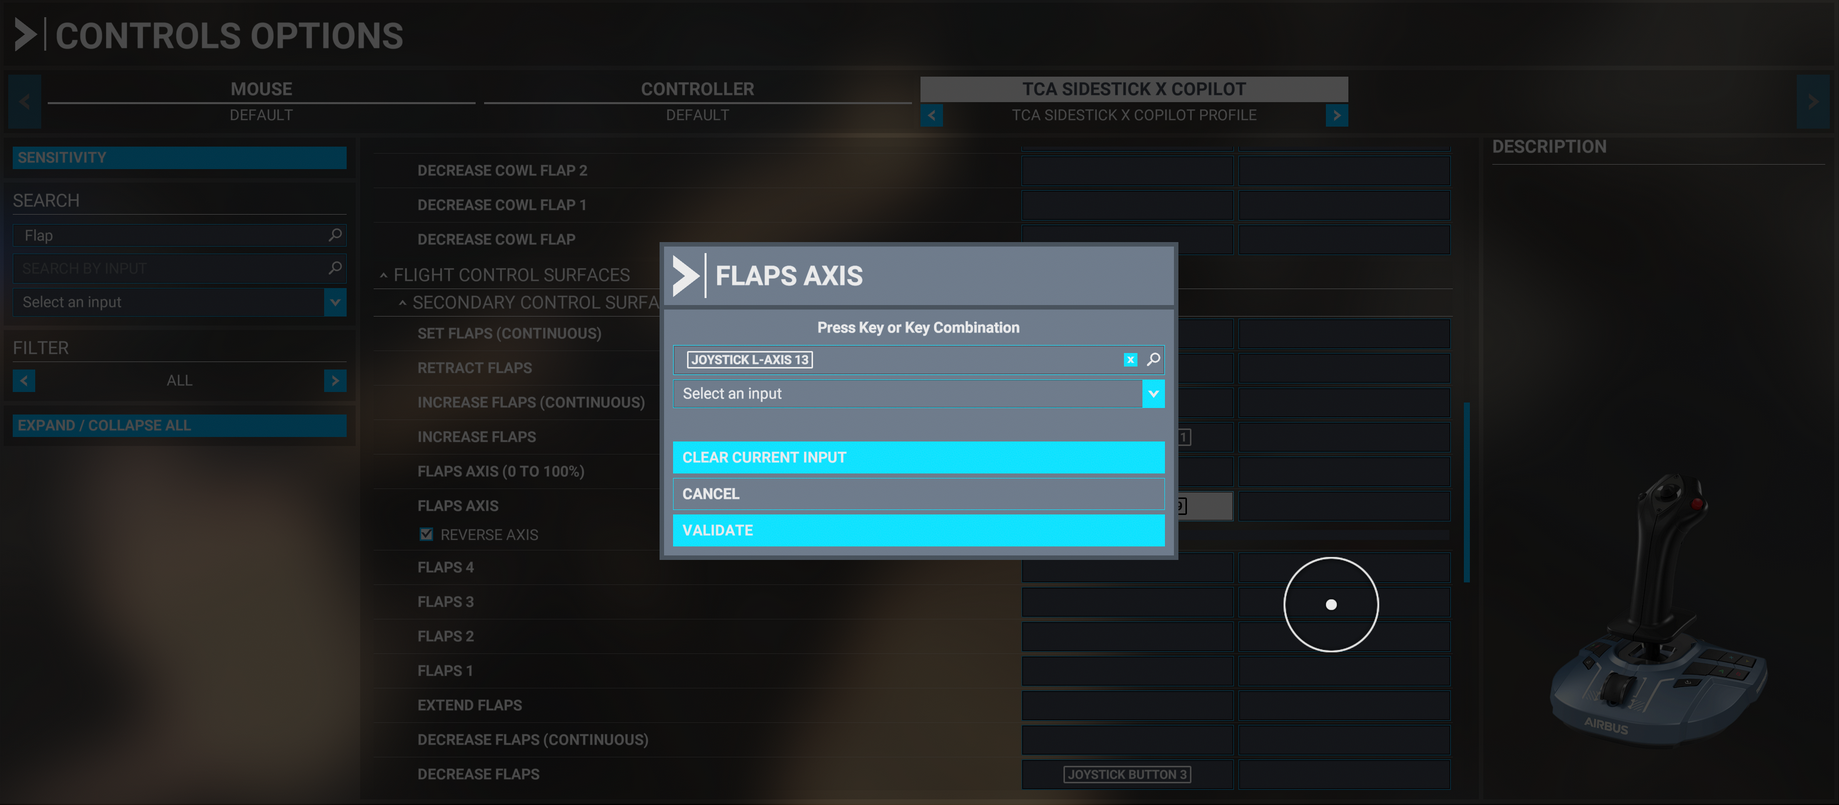
- Click Validate and save your profile
The Reverse axis is checked.

5.2 Rudder trim right, left and reset: under the Filter menu select All
In the central column open Flight control surfaces then open Control trimming surfaces.
Find Rudder trim right and, on its line, click on the left rectangle (you should see Joystick Button 29, click to replace this axis).
- In the search window, open the list Select an input.
- Find and select Joystick Button 47
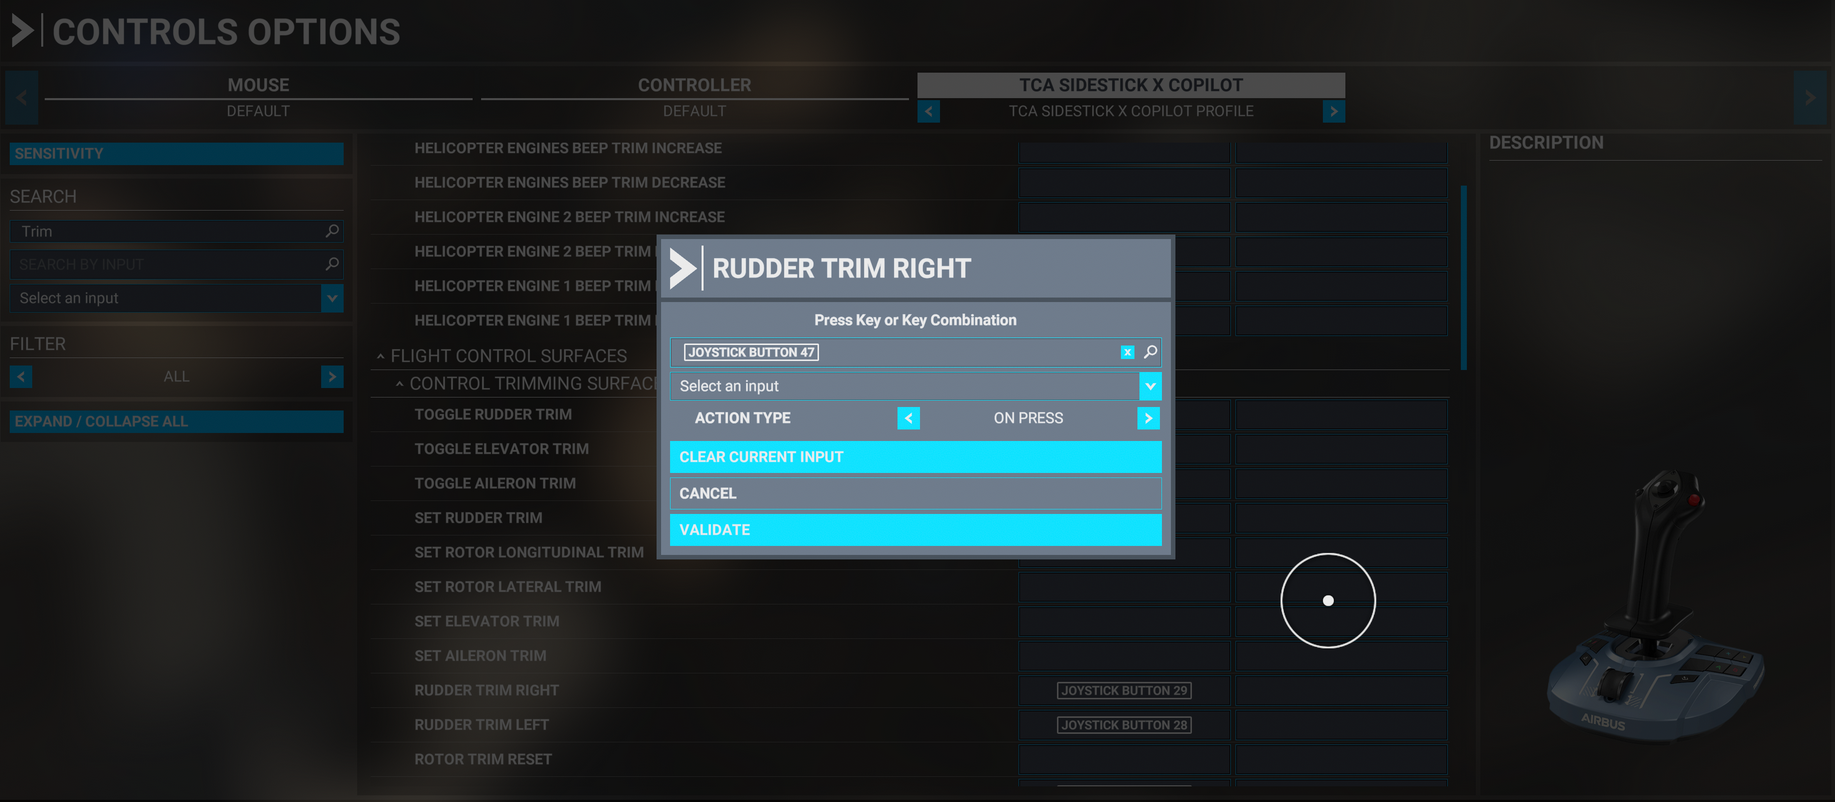
- Click Validate and save your profile
Repeat the operation and find Rudder trim left and, on its line, click on the left rectangle (you should see Joystick Button 28, click to replace this axis).
- In the search window, open the list Select an input.
- Find and select Joystick Button 46
- Click Validate and save your profile
Both axes of the rudder trim are assigned
For the reset button, repeat the operation and find Reset Rudder trim and, on its line, click on the left rectangle.
- In the search window, open the list Select an input.
- Find and select Joystick Button 45
- Click Validate and save your profile
5.3 Parking brake: under the Filter menu select All
In the central column open Brakes then open Set Parking brakes (you should see Joystick Button 30, click to replace this axis).
- In the search window open the list Select an input.
- Find and select Joystick Button 48
- Click Validate and save your profile
Before you play:
All axes and buttons on both your TCA Quadrant Airbus Edition and TCA Quadrant Add-On Airbus Edition are now assigned and will work in the game.
But as we specified, these settings need more adjustment depending on the aircraft you fly, more specifically for sensitivity of the axes (see part 2). Do not hesitate to contact Microsoft Flight Simulator 2020 and their community for more information.
Up to you !